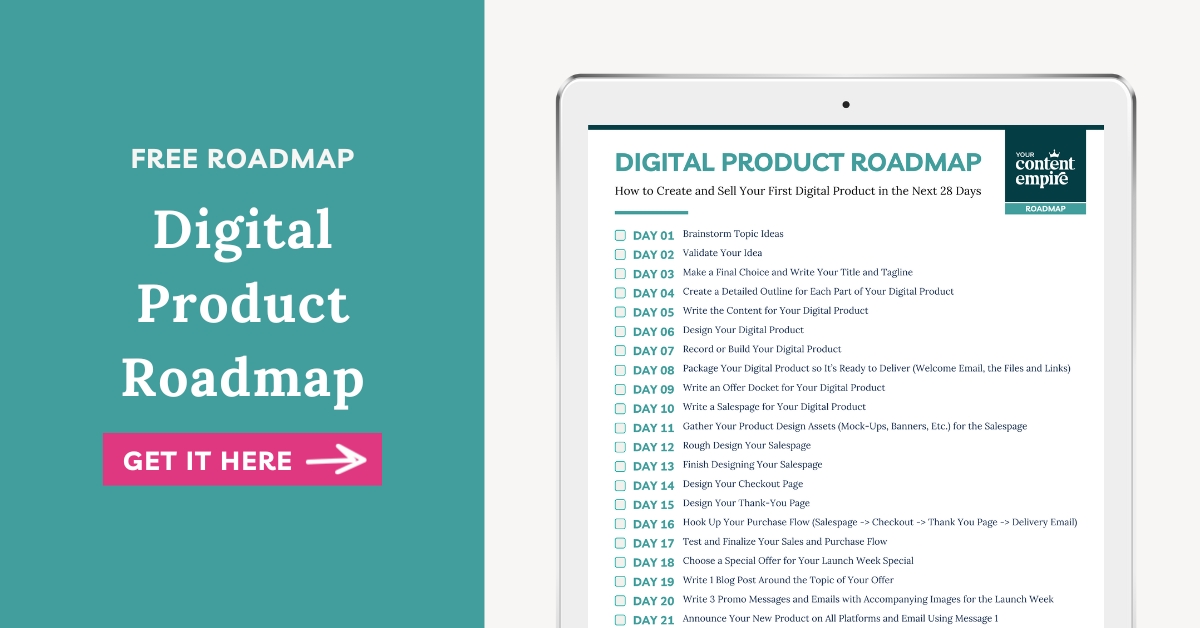
Sign up to get instant access to the Digital Product Roadmap!
Want more profitable + strategic content? Grab my free content planner!


I’m Hailey – content strategist and founder here at Your Content Empire where we help you create more profitable, purposeful and productive content — and hopefully enjoy yourself more while doing it too. Learn more about me here >>

I once had a coaching call with a service provider who desperately wanted to start offering digital products so that she could replace some of her income and get back more time. We started by reviewing her content bank, and I noticed in the paid offers column, that besides her services, she had 4-5 products listed.
I asked if these were just ideas or drafts. She told me they were done, but she hadn't done anything with them yet. So here she was with a goal of offering digital products, with digital products already created, just sitting there for at least a year. The biggest thing stopping her? It felt like such a hurdle to get the salespages done and products ready to sell.
A lot of business owners find this crucial step overwhelming (so if you’re in a similar procrastination-ship, know you’re not alone). Creating your digital product is just the tip of the iceberg when it comes to actually selling (keyword – selling) digital products.
This post covers part 3 of taking your digital product from non-existent to actually making you money.
Ready to move forward and get ready to sell? Let’s dive into the 5-step process.
Want the full roadmap for creating and selling your first digital product?
Selling your info-product effectively is all about nailing down cohesive, aligned messaging. This is why every launch, every sales funnel, every campaign I run and manage—for others and myself—starts with an offer docket.
An offer docket is a document you create that outlines what your product is, who it’s for, and what’s included. You can think of this as your one-stop shop for all things about this product.
Here are some examples of the questions to answer in your offer docket:
Whatever you do, don’t skip this step. Your offer docket will make your life easier when creating any content (especially marketing and selling content) related to your offer. You can always reference it as needed to help you frame your other selling and marketing assets.
Ready to create your offer docket? Read How to Create an Offer Docket to Position Your Offers and download the Offer Docket checklist as the first stage of positioning your info-product to sell.
Once you have your offer docket, your salespage is up next. The good news? Writing a salespage is actually really easy when you take your time to create a really high-quality offer docket.
I recommend creating your salespage with two separate steps. First, you simply want to assemble the information. Don’t worry about making the copy perfect.
All you need to do is compile all the information you need onto the page in this order (this is just one sample of a salespage outline – you can add more or less sections as you see fit):
This is where you make the messaging even more effective through my 4 phase editing process
Editing Pass #1: Edit for Clarity.
Go through each section and ask yourself:
Editing Pass #2: Edit for Personality
Next, you want to make sure the copy sounds like you or your brand voice. If you have a personal brand, these are ideally one and the same.
Go through each section and ask yourself:
Editing Pass #3: Edit for Emphasis
The next editing pass focuses on emphasis, especially through formatting.
Take your time going through every section and ask yourself:
Editing Pass #4: Final Proofread
The last and final editing run is to go through each section and do a final proof. It’s best to leave a day or 2 in between so that you’re coming back to your copy with fresh eyes or potentially ask someone else to do this pass for you.
This is when I like to add things to Grammarly to check over too – although I don’t accept all of the recommendations if there are any typos, it’s usually pretty good at picking them out.
If you’re ready for a deep dive into salespage creation, read The Easy Way to Write Your Next Salespage, and don’t forget to download the Salespage Writing Kit that goes along with it.
Before diving into the design of your salespage, make your life a little easier by simply gathering the design assets you’ll need before (much like making sure you’ve got all the ingredients for cookies before you start cracking those eggs).
Here’s a list of some typical salespage design ingredients:
Gathering all the elements you need before starting the actual design process will save you bucketloads of time by avoiding context switching (which will help especially if you feel like this is an area of the process you’re tempted to put off).
Designing your salespage might sound like a big task, but if you’ve completed all the other steps to this point it won’t be as tough as you think.
I like to start by roughing the whole thing from start to finish so all the sections—just getting all my copy and images onto the page even if they’re super ugly at this point.
And then go through section by section and clean it up—just as you would have done with your copy if you followed my 4-phase editing process above.
Here are some extra design tips to keep in mind when designing your salespage:
The final step is basically to finish dotting those I’s and crossing those T’s by making sure you’ve created and hooked up each step of the purchase process. We’re talking the checkout page to thank you page to welcome email and access automations.
There’s no worse feeling than getting that email from a customer who says they didn’t receive your product or they’ve been trying to sign up but the button doesn’t work. This final step ensures every piece is in place so your customers can have a seamless transaction when they purchase your digital product.
Here's what you need to do to finish your purchase system:
Whether you created digital products to gain more passive income, increase your potential for exposure, or share your expertise and passion on a subject you know well (or a mix of all 3)—that’s never going to happen without the selling part.
Every part of the process counts, so don’t miss a thing by downloading the FREE Digital Product Roadmap below:
Most of the problems with your current content strategy can be fixed with one tiny shift—changing how you plan your content. Specifically your monthly content planning process which we're covering in this post ↓ The issue with the typical approach is that people make...
Do you have a monthly membership that you’re struggling to get new members in? Or maybe you have a steady stream of new members, but you want to scale it so you have a higher monthly recurring revenue? In this video, I’m giving you the ultimate monthly marketing plan...
Today I want to share with you how I doubled sales in my funnel with the exact same number of leads. Because, while yes, you can definitely increase the amount of traffic you’re driving to the top of your funnel—it’s always best to do so once you know your funnel is...