“As an entrepreneur, I've learned to surround myself with people who have skills that I lack. FB ads and email funnels were something I knew I wanted to be doing in my business but I had no idea where to start. I put it off for a while because it was outside my comfort zone, and it wasn’t until I found Hailey that I felt confident moving forward with them. Hailey took the reigns and created a system for me that was not only profitable, but really helped me create more space in my day to work on the things that are in my zone of genius!”
Lauren Bongiorno Diabetic Health Coach
Click Here to Design Your Lifestyle-First Business Model with My Free Template
How to Map Out A Profitable Sales Funnel for Your Business
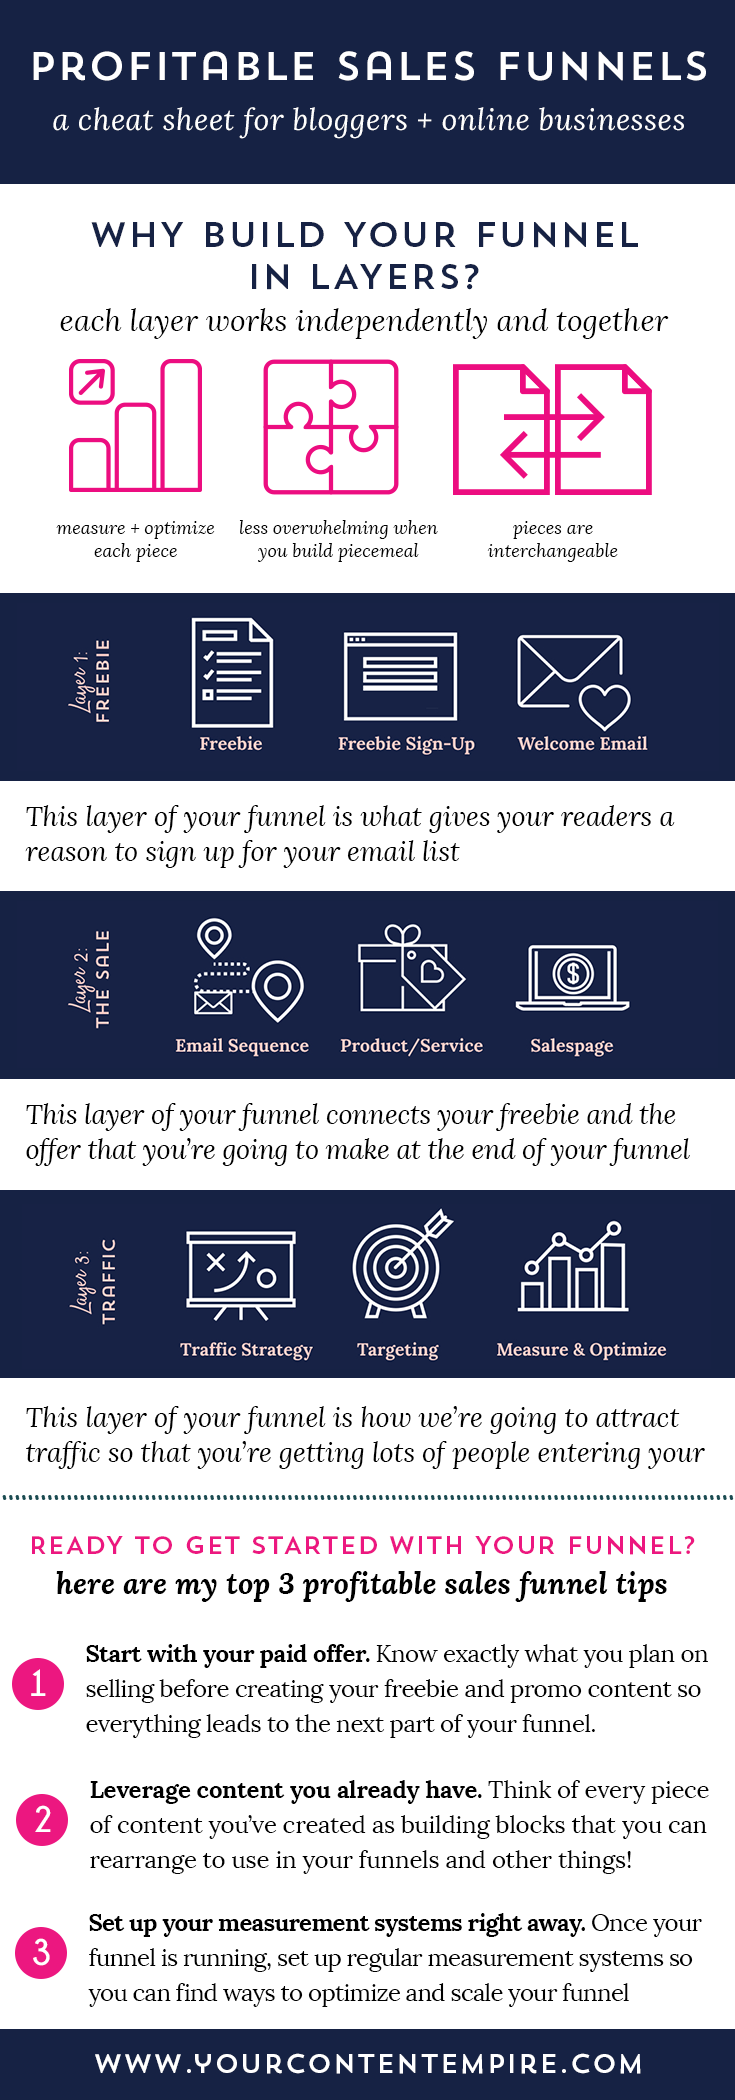
When it comes to creating a sales funnel plan or the actual building of your funnel, I’m a personal fan of layers – 3 in particular:
The Freebie Layer – including your freebie, sign-up page, thank you page and welcome email
The Offer Layer – consisting of your email sequence, salespage and purchase sequence
The Traffic Layer – which revolves around your traffic and promotion plan including paid, earned, shared and owned traffic types
This method works – and I’ve been proving it for the last 4 years.
Prefer to watch this blog post instead? Click on the video below!
So if you’re wanting to start hitting new income and revenue milestones, building your email list full of the right subscribers: Follow along with this post with the funnel mapping worksheets in hand. You’re going to walk away with a fully fleshed-out plan for your funnel that’s going to get you more than prepared for the actual work of pulling all the pieces together.
And you may discover that you already have a lot of the pieces in place so you don’t have to start from scratch!
It all starts here – with your paid offer
The first step to creating your sales funnel plan is to get 100% clear on what offer you're going to build it around.
The image above is a tool I use in my business called the content layer builder (aka the golden circle of content profitability). As you can see from this image, we want to picture all of the content you use in your business as a target.
It’s also another way to look at your funnel content too.
At the center is your paid offer (and to preemptively answer a frequency-asked-question, yes, if you have multiple offers then you're going to have multiple content layer builds for your business).
Then in the next ring, we have your freebie layer.
The final two outer rings are dedicated to your traffic layer content. Ring 3 is for the content that you regularly publish on your blog (whether it’s written, audio or video). Then the final ring is your promo content, which is intended to drive traffic back to your website and onto your blog and email list.
So with that being said, what offer are you going to build this funnel around?
Is it a service, a product, a digital product? It can be anything.
But some advice is to start with where you are.
What is the biggest income-producing offering your business currently or the one that has the most potential in your business?
One mistake that I see a lot of people make is creating their funnels around offers that they have yet to create. So a course they’ve been thinking about creating forever or an ebook that’s just been outlined. You can absolutely build an amazing funnel to support these offers, but wait until they're ready.
Start with what you already have complete and could sell today if you just put a button and a page on your website. What could you ship today? What could you deliver today if you received an order right now?
ACTION STEP #1 – DECIDE ON YOUR OFFER
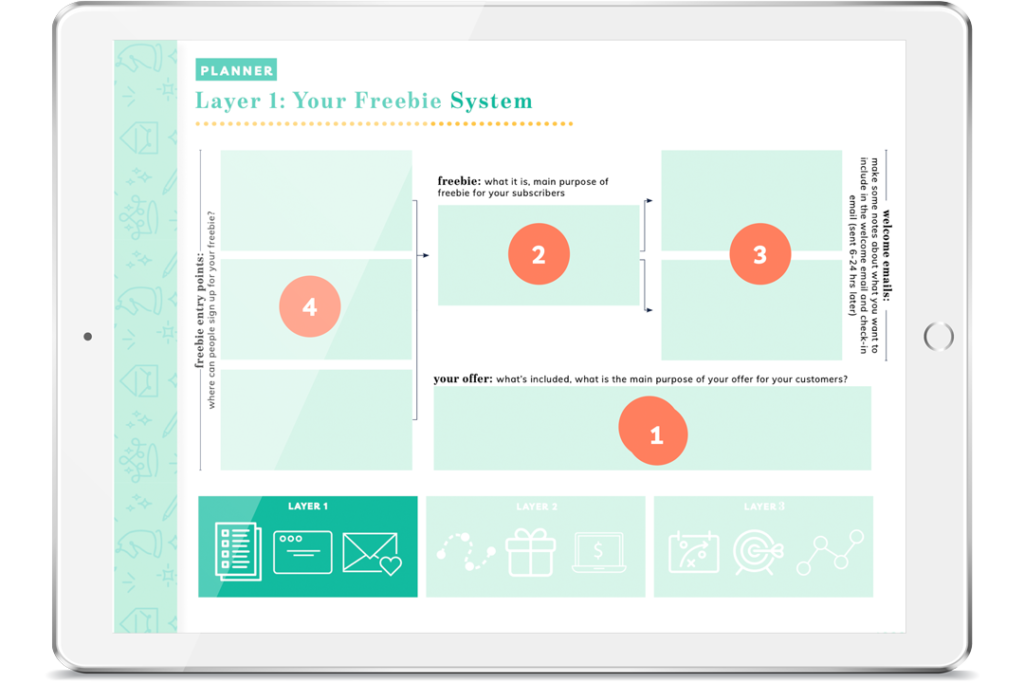
Sales Funnel Plan: Your Freebie Layer
As mentioned the freebie layer includes all the pieces required for someone to sign up for your free gift and then get welcomed to your email list. Those pieces are your freebie, sign-up page, thank you page and welcome email.
Here are the steps to map out this layer of your profitable funnel:
Step 1: In box #1, write down your offer.
And take one additional step by also writing down the biggest problem that your offer solves for your customer or client. And if it isn’t a problem per se what is the most important benefit that your offer provides.
Step 2: Decide on your freebie.
What freebie are you going to use to attract people who are perfect candidates for your paid offer? Is there a smaller problem that you solve with your freebie that would offer a preview of what the full offer provides?
Step 3: Jot down some notes for your welcome email and check-in email.
The welcome email should deliver your freebie, introduce them to you and welcome them to your community. This is likely the most opened email of your entire sequence and sets the tone for your relationship – so make it count. The check-in email is sent either 6-8 hours later or the next day is essentially a reminder to use the freebie and why they signed up for it in the first place (all those juicy benefits).
Step 4: Determine your freebie entry points.
Your opt-in page, forms on related blog posts, your social media bios. What is the call-to-action? What are the benefits that you’re going to focus on selling in your free offer? Jot down some notes for these places where people will be signing up and accessing your freebie.
Congrats – you’ve officially finished outlining your freebie layer of your funnel! Let’s move onto the next layer.
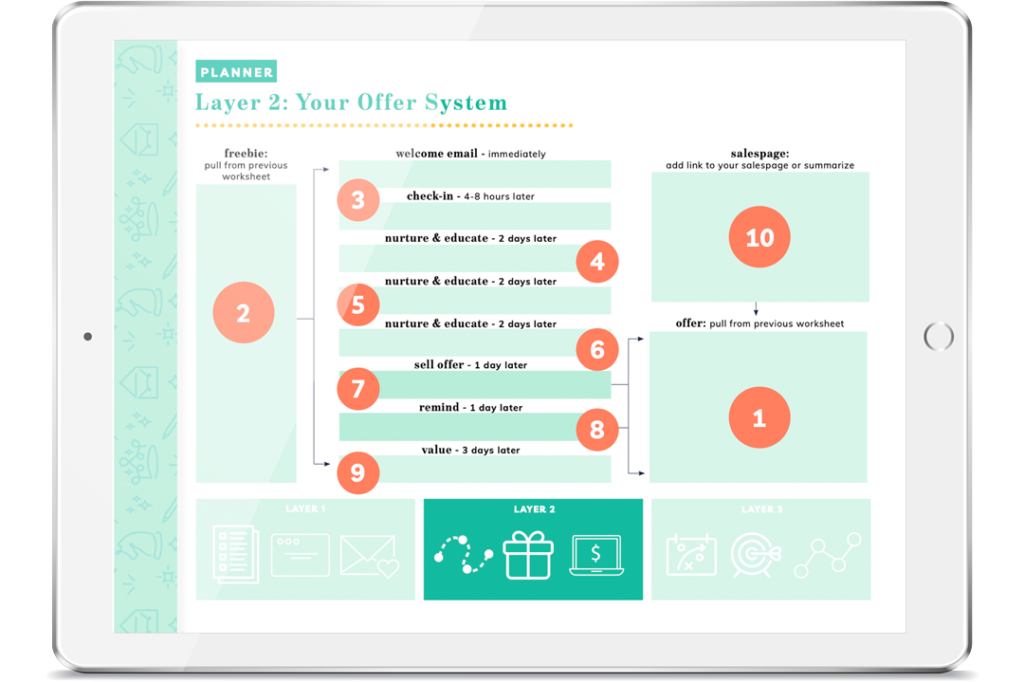
Sales Funnel Plan: Your Offer Layer
The offer layer is what moves your subscriber from the freebie, through a nurturing and education journey, towards your paid offer. It includes your email sequence, salespage and purchase sequence (thank you page, welcome email, etc.)
Here are the steps to map out this part of your funnel.
Step 1: In box #1, write down your offer.
Repeating a bit from step one but just to keep it top of mind: write down your paid offer in box #1. And take it one step further by jotting down the things that have to happen once someone purchases your offer (do you have to send them an email or a form, do you have to book a call, does there have to be a thank page?)
Step 2: Write down your freebie.
This is so when we’re planning out your email sequence, we know the starting point (your freebie).
Step 3: Jot down your email notes.
Your welcome and check-in emails are already mapped from the previous layer but you can jot some notes in these boxes.
Step 4: Create your value email.
There are many, many ways you can use this email but the main point is to add even more value. Some ideas: (1) a video walk-through or tutorial on how to use your freebie that answers some commonly asked questions or sticking points. (2) a link to an epic blog post or interview that explains that subject even deeper (3) tools to help turn the freebie into a repeatable system (4) another related freebie or content upgrade you’ve created
Step 5: Create your education email.
In this email, we want to start positioning your paid offer. Can you show your offer in use whether through images or a case study? Can you list out the different ways your offer can be used? We’re not directly pitching in this email but we are piquing interest.
Step 6: Create a second value email.
What do you have that can add even more value but relates to your offer since we’re sending a sales email next? And specifically, think of 3 reasons why someone WOULDN’T want to buy your offer even though they’re a perfect fit for it and would really benefit from it. Choose a topic for this email that resolves one of those objections. Think: simple pdf freebie, video training, guest post or interview, epic blog post
Step 7: Create your first pitch email.
What is the special offer that you’re making? Something that’s going to make them want to take action right away? It can be a special price, a bundle or a bonus that’s only available for a limited amount of time or to a certain number of people. In this email detail out your special offer and all the ways this offer will improve their life/business/health/etc.
Then you have your reminder emails which are all sent on the final day of your special offer. I usually do two of these emails sending one of them 12 hours before and another 4-6 hours before the special ends. In these emails, I’ll sometimes include testimonials, frequently asked questions, objection busters and reminders about the benefits and why this is the perfect time to take advantage of this special offer.
Step 8: Your follow-up sequence.
Follow-up your pitch emails with some more value. Basically, a reminder that you won’t just be selling to them but they’ll get a lot of other great stuff just for being on your list too. So I’ll send one more freebie and then move them into my main email list or another nurture funnel. So in this box, jot down some ideas for that final value email of the sequence.
Step 9: Create your salespage.
You may already have a salespage for your offer or your might have an offer that you sell with a consult call (see my coaching funnel blog post here) but you can use this box to write down the sections that you want to include in your salespage if you haven’t created yours yet.
Just a note: You may have more sales emails between the first sales email and the reminder emails depending on the number of days you’ll be running your special offer for. The basic rule is to send one per day until the promotion is over. If you need more ideas for emails, check out my sales email grid post here.
Great job!! If you’ve completed this section – your email sequence is all planned out and ready to create!
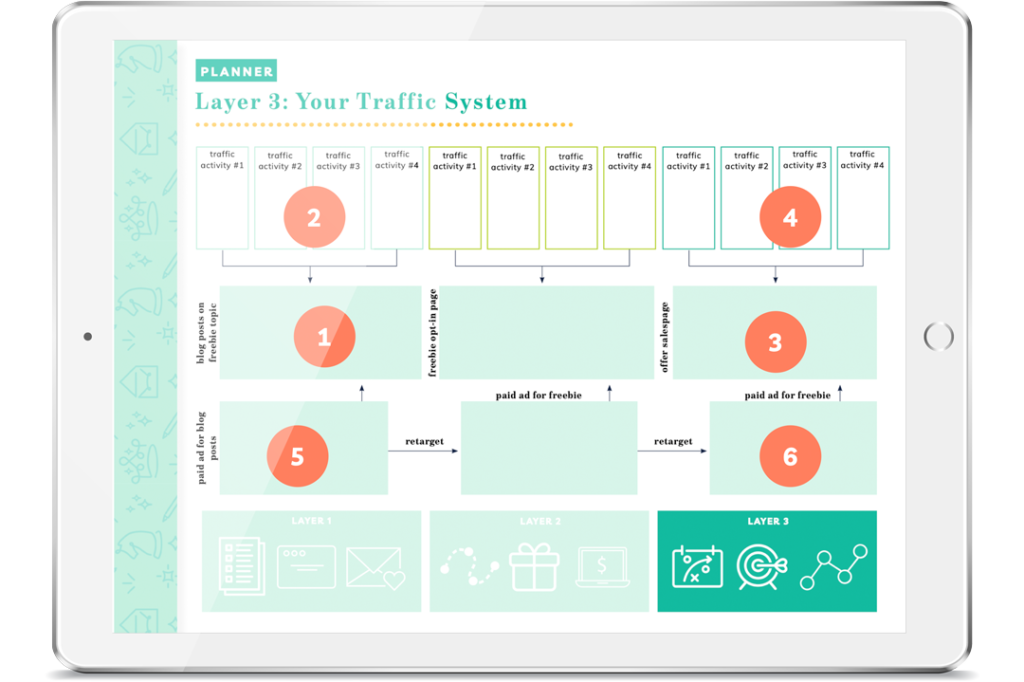
Sales Funnel Plan: Your Traffic Layer
The traffic layer can make or break your funnel. So many people have incredible funnels but fail to drive any traffic to it so automatically assume that what they have isn’t good enough. And in order for your funnel to work, you need people to go through it.
Here are the steps to map out this part of your funnel.
Just a side note – this is a really simplified version of a traffic strategy that includes all the basic pieces. So you may want something a little more robust but this will be a good starting point regardless to get your ideas out of your head and into the plan!
Step 1: Optimize your blog posts for conversions.
Blog posts can serve as great landing pages for your funnel. So any blog post you already have that relates to your freebie, optimize it for conversions. Weave in sign-up forms and call-to-actions throughout the post. Add an exit-intent pop-up. Put it at the bottom of the post and in the sidebar if you have one. Use this space to write down any existing related blog posts you have, any ideas for blog posts you could write soon and your checklist for optimizing them.
Step 2: Set 1 of organic traffic sources leading to blog posts.
What’s your promo plan for your blog posts? Organic means anything that isn’t paid. So this might include: social media, Pinterest, emails to your list, doing a Facebook live on the topic, sharing it with your network.
Step 3: Write down notes about your freebie sign-up page.
Anything you need to optimize here before driving traffic to it?
Step 4: Set 2 of organic traffic sources leading to your freebie sign-up page.
What’s your promo plan for your freebie? Organic means anything that isn’t paid. So this might include: social media, Pinterest, emails to your list, doing a Facebook live on the topic, sharing it with your network.
Step 5: Facebook ads for your blog posts.
Do you plan on running any weekly paid ads about your blog posts? This might include: a Facebook ad, boosting a live your do about your post, an Instagram story ad, a promoted pin.
Step 6: Your retargeting ad for your freebie.
If you’re running weekly ads for your blog posts, you’ll likely want to put some sort of retargeting ad in place for anyone who engages with your content but hasn’t signed up for your freebie or email list yet. Put down any notes if this is a part of your action plan. One note – you could also just turn this on for one week a month instead of running it all the time if you prefer.
Feeling Inspired to Create Your Sales Funnel Plan?
Having an offer is great, but it’s not going to do anything for you unless you’re driving traffic to it. Creating a sales funnel is as easy as sticking to three layers:
The Freebie Layer
The Offer Layer
The Traffic Layer
This strategy will get you to new income levels and revenue milestones by building your email list full of the right subscribers.
Let’s get people converting! Sign up for the free workshop and grab the planning worksheets to begin (or re-begin) your human-centric funnel.
HEY THERE!
I’m Hailey and I help business owners who are tired of the hustle-harder advice build content systems that actually sell. No performative posting. No chasing algorithms. Just strategic, sustainable growth. More about me + my approach →
Stop guessing. Start scaling. This one-page template helps you design a business model that supports both your revenue goals and your actual life.
Browse By Topic
Scaling
Sales
Content
All Posts
Search The Blog
FREE TEMPLATE
The Lifestyle-First Business Model
Design a business model that supports both your revenue goals and your real life. This one-page template walks you through your lifestyle factors, positioning, offer map, revenue plan, and sales strategies so you can finally stop guessing and start scaling with clarity.
In This Post: How do you get more sales from your sales funnel? The best way to get more sales from your sales funnel is to follow up with the people who didn't buy the first time, since only about 5% of your audience is ready to buy at any given moment. Set up a...
In This Post: How do you reset your business model? You reset your business model by rebuilding it in the right order: lifestyle first, then positioning, offers, revenue planning and marketing. Follow that sequence and you can reset your business model in about 90...
In This Post: What is a monthly business retreat? A monthly business retreat is a full week you block off each month with no meetings, calls or client work so you can focus entirely on the projects that grow your business. Rotating through a few types of monthly...